Last year something came over me. All of a sudden I got an artistic urge to start doing my own gel x nails. There was something about gel that seemed a little less daunting than acrylic and after I watched a few tutorials I was ready to start doing my own nails! Today’s post is a simple guide on how to do gel x nails at home!

What Are Gel X Nails?
If you don’t know what gel x nails are they are a soft nail extension made out of, as the name states, gel! Unlike acrylic, these extensions cover your entire nail bed instead of just the tip. Since they are soft and bendable they give your natural nail more flexibility to withstand bends and breaks!
Supplies Needed For Gel X Nails At Home
The Basics
These are going to be the bare minimum things needed for doing your own gel x nails at home! No Extra frills or bells or whatever you call it. Just the tools needed to get a nice simple manicure done!
1. Gel Nail Kit – For Beginners (MY NUMBER ONE RECOMMENDATION!!)

When I started doing mine I had no nail supplies whatsoever. I wasn’t a nail girly who painted her own nails or went to the salon every few weeks so I had to start from scratch. Since I was starting from ground zero I opted for a gel nail kit. It came with everything I needed to get started from the UV lamp, gel polishes, nail files, and more! This is the one I originally started with and it was great as a beginner at an affordable price!
Other Gel X Nail kits I recommend:

These are the actual gel extensions that you’re going to be using to elongate your nails and the exact same ones that I used! This set comes with both coffin shaped nails and almond shape in the size long. It also includes the gel x nail glue to attach them to your natural nails and a standing UV mini light which is super helpful when applying the extensions!
Other Gel X Nail Extensions I recommend:
- The UNA GELLA 216 Pcs Almond Nail Extensions in Medium (does not include gel x nail glue you buy one here)
- The Beetles Medium Almond Nail Extension Kit
3. UV Light & Standing Mini UV Light

If you have opted not to buy the gel nail kit I have listed above you’ll want to make sure you have a UV light to cure your nail extensions! A standing mini UV light is also a must since it will make applying your nails a lot easier! (I tried doing mine without the mini UV light and it was a mess!) TIP: If you bought the nail extension kit I mentioned it comes with a free mini UV light!
Other UV lights and Mini Lights I recommend:

You’ll need some nail polish to paint your extensions! I listed a beautiful pastel set that I constantly use every time I do my manicure! These gel nail polishes are easy to apply and cure beautifully! (You may use regular nail polish as well!)
Other Gel Nail Polishes I recommend:
5. Nail File

For me this is an absolute MUST! You’re going to need at least one nail file to make sure your extensions actually fit the shape of your nail! It’s also always great to have some on hand in case you want to shape your nails into another shape your extensions don’t come in! I bought this set that comes with 12 pieces and includes buffing blocks!
Other Nail Files I recommend:
The Extras
The next list of supplies are *extras* you don’t necessarily need to have these items to do your gel x nails at home BUT they are super nice to have! These are especially nice if you want to do more intricate designs and patterns on your nails!
6. Nail Clippers & Nail Drill

Nail clippers are great to have on hand especially if your extensions are a little too long for the look you are going for! You can easily cut them down and then file them into your desired shape! I have these ones! A nail drill might not be something that you will use right away but it’s nice to have when doing cuticle maintenance and taking off your gel x nails! I have this set that came with a variety of drill bits!
Other Nail Clippers and Nail Drills I recommend:
7. Nail Brushes & Dotting tools (For Intricate Designs)

Nail Brushes are critical if you’re planning on doing any intricate designs! They are super helpful in getting super thin and smooth lines! You can also use dotting tools to make cute little flowers, smiley faces, and more! You can check out my favorite nail brushes and dotting tools here that come in an affordable set with other nail supplies!
Other Nail Brushes and Dotting tools I recommend:
8. Cuticle Oil

Cuticle oils are great for adding back any moisture we’ve removed from the nails while doing our manicures! I love using this one after I’ve finished the entire process! Since using it my natural nails actually feel stronger and as an added bonus it smells amazing!
Other Cuticle Oils I recommend:
Application- How to Apply the Gel X Extensions!
- Take your gel x extensions and start measuring them on your nail to find the right fit. You’ll want to make sure the nail fits perfectly on each side of your nail bed. If you can’t find an extension that fits perfectly you’ll want to find the next size up and then file the sides so the extension fits flush to your nail bed!
- Make sure your nails are clean and have no oil, fuzz, or any other type of debris on them! This is key to making sure your extensions adhere correctly. Optional Tip: File the inside of your nail extension to make it a rough surface. This allows the glue a little extra hold onto the extension.
- Add a dollop of glue to your nail extension! And I mean a good amount of a dollop! You’re going to want to make sure there is enough glue to fully cover your nail bed but not be spilling out.
- Take the extension and gently press it up against your nail cuticle and push slightly down onto your nail. You don’t want to be pushing so hard that the extension is angling down on your nail. It should be perfectly straight when you hold your hand up and look at your finger from the side.
- Flash Cure your gel x nail extension by holding it under the standing mini uv light for 30 seconds. This will allow it to harden enough that you can finish your other fingers on your hand.
- Once you have all of your extensions applied to all nails on one hand you’ll want to fully cure them under the UV lamp for 60 seconds. DO NOT SKIP THIS STEP. You do not want to have gel x nail extensions that are not fully cured as this can lead to contact dermatitis.
- After you have fully cured your extensions, you can then polish them using any gel polish you would like! Since you’re using gel nail polish you can wipe away any mistakes with ease before curing the nail! Don’t forget to add a top coat to lock in your design! Tip: You can use regular nail polish as well on these extensions just make sure they fully dry between each coat!
- Add a cuticle oil once you’re fully done with your nails! This helps replenish any oil we have gotten rid of while preparing the nails and working on the design! It also just makes me feel SOO pampered after that I never skip this step!
I know some people are visual learners so I will also link the video down below that I used while learning how to do them myself! She also shares tips on how she keeps her gel x nails long lasting and has some good design inspiration!
Inspiration: My Gel X Nails At Home
I decided to show you a few pictures of how my gel x nails that I did at home turned out! It can take a while to get used to doing your own nails at home but I promise once you do it enough times it becomes easy! I love having control over how my nails look and I don’t have to go back to the salon every 2 weeks for a fill or spend $100+ because I want a cute design! Take it slow and have fun with the process! As you continue your skill will grow and it’ll become a faster process!
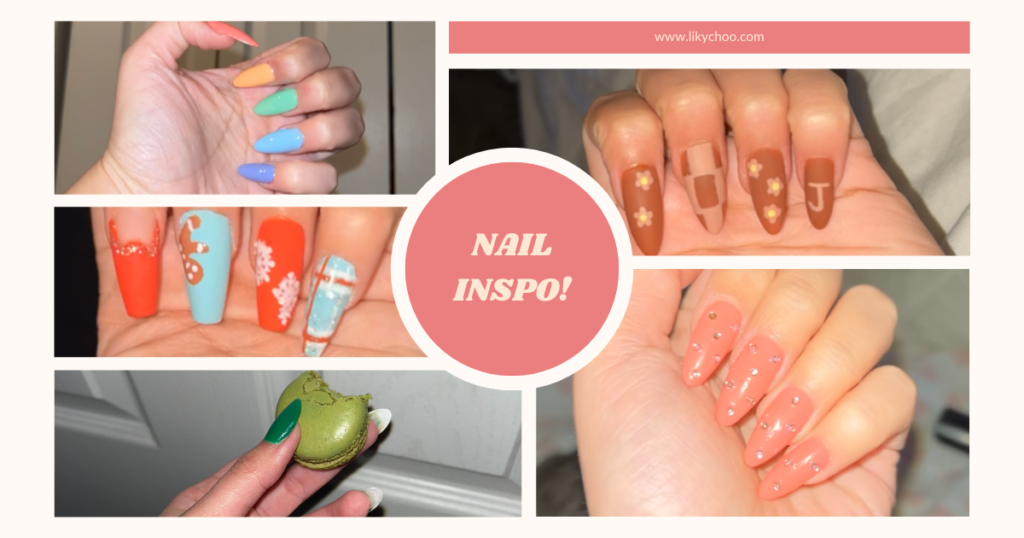
(Now that I’m looking at my photos it may have been the fact that I got engaged last October that fueled my desire to always have the cutest nails lol my engagement ring was cropped out)
That was my simple post on how to do gel x nails at home! I hope you enjoyed it and decided to step into the world of doing your own nails at home! It really is so much fun, rewarding, and saves you a ton of money in the process!
If you want to check out my most recent post dedicated to the cutest back to school essentials for this year you can check that out here: Pink Girl Back to School Essentials! Not only will you have the cutest nails but now you’ll have the most aesthetic academic essentials!
Affiliate Disclosure: Hi friends! This post may contain affiliate links. If you purchase something through one of the links, you won’t pay anymore, but we will get a small commission, to help keep us up and running. I don’t promote anything I haven’t/am currently using and wouldn’t recommend to my own friends and family. Thanks!


Leave a Reply